Are you considering getting your car's paint corrected, or were you offered a paint correction and now ask yourself if it’s worth it? In this article, we introduce you to the concept of paint correction and polishing and try to explain to you why you should opt for a professional paint correction job.
The basics of gloss and shine on automotive paint
The principles of shiny or glossy cars are simple: the more perfect a paint surface is, the more gloss or shine you will see. However, gloss is often misunderstood and wrongfully used, especially in car care marketing, so we need to talk about some of the basics first.
From a scientific viewpoint, gloss is defined by how well light rays are projected off a painted surface that they hit. In that sense, ultimate or perfect gloss is achieved when a light ray bounces off a painted surface at the same angle that it hits it. Everything and anything that affects light rays and leads to them not bounding off your car’s paint at the same angle as they hit it will reduce gloss.

In the real (detailing) world, the term gloss is often used in a different way. In fact, it is perfectly possible to make any car’s paint look shiny without even touching it by just taking a picture from the right angle and in the right light. From very shallow angles and without a strong light source shining at the paint, even completely trashed-up paint will look glossy, shiny, and reflective. Photographs of “mirror paint” taken from those shallow angles are plain silly and wring if someone is trying to prove or show “gloss”.
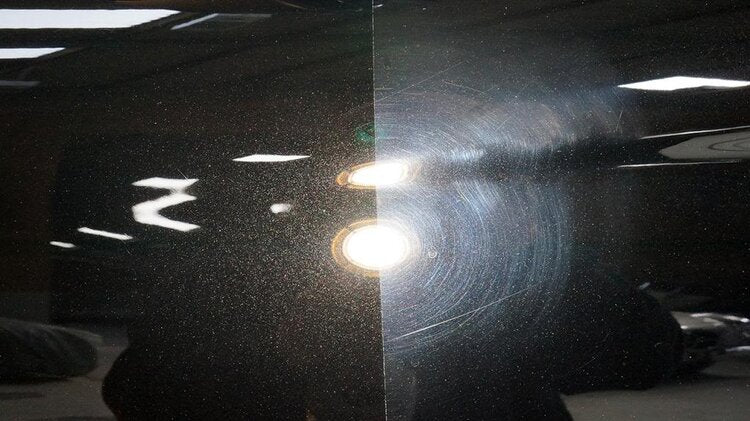
The only way to really inspect a car’s paint condition is by shining a strong light source and looking at it from a straight angle. Only then you'll be able to see scratches and swirls. Ultimately, those are what reduce gloss, and that’s what we tackle with paint correction.

Paint defects, how they occur, and how they reduce gloss
Paint correction makes your car look better because it, as the name suggests, corrects paint defects. Paint defects make your car’s paint less shiny because they are imperfections in an otherwise (more or less) perfect paint surface. As explained above, if a light ray hits a perfectly flat paint surface, it bounces straight off and, therefore, creates gloss. If the same light ray instead hits a paint defect, then it is refracted and “trapped” within that paint defect, as paint defects in fact are “craters” in an otherwise flat paint surface. Therefore, light rays simply can’t bounce off a paint defect, which is why paint defects decrease gloss.
So, after you know what paint defects are, we think you should also know how they occur in the first place – so that you know how to prevent them or at least reduce their occurrence in the future. Paint defects are created by pretty much anything and everything. Even just driving your car around or wash it by hand will create paint defects. Everything that hits paint with enough speed or force will be able to put swirls or scratches in your car’s paint. Shocking, right? Yes, some paint finishes are more equal than others, meaning they are quite hard (e.g. on German premium and luxury cars), whereas some are very soft (e.g. on Japanese cars) which means some cars will always scratch up easier than others.
Automotive paint is thinner than a human’s hair
What’s important to understand in regards to paint correction is that all types of paint defects (swirls, scratches, etchings, holograms, haze, waterspots, clear coat failure, orange peel, … for an overview, see: https://youtu.be/x2tFDe3Jt0c) can be of different depth. In this respect, a car’s paint consists of different layers:
- Primer: first layer on top of your car’s body, which acts as “glue” between car body and paint
- Base coat: the actual color of your car
- Clear coat: transparent top coat which protects the base coat
Yes, there are (mostly older and/or cheaper) cars on which base coat and clear coat are mixed and just one layer, but that’s becoming rarer and rarer. What’s important for you to understand is that based on cost-saving activities by manufacturers as well as innovations in painting technology, car paint nowadays gets thinner and thinner—unless we look at exotic (and expensive) cars. The total amount of paint (primer, base layer and clear coat) that sits on your car’s body will be somewhere between slightly less than 100 up to about 200 microns. That’s thinner than a human’s hair!
As you can imagine now, paint correction is quite a delicate job, as you’re working with extremely thin and fine layers of paint. Because what is vital to take away from above is that you can only correct and remove paint defects which are located in the clear coat of your car’s paint. What’s even more important to understand and comprehend is that paint correction is not removing paint defects, it is permanently removing clear coat. By polishing, you are not removing paint defects; you are removing the area around them by levelling the clear coat to the deepest part of a scratch or swirl. Scratches or other paint defects like rock chips which reach further than the clear coat can usually not be corrected anymore and require a respray or touch-up paint job.

How does paint correction actually work?
In layman’s terms and simplified to the bare minimum, paint correction and polishing is like sanding wood with sandpaper. You have different aggression levels of sandpaper based on what you want to do and achieve. To really flatten a wood plank’s surface and remove as many imperfections as possible, you use a very coarse sandpaper (40, 60 or 80 grit). After that, you end up with a rather flat, but still rough wood surface. That’s why you then use a medium grit sandpaper (100 to 200) to further refine the surface. And for that final stage, you then use a really fine grit sandpaper (like e.g. 300) to create a really, really smooth surface which feels extremely good to the touch.
Automotive paint correction products are a little bit more intelligent than sand paper, but generally work the same way. Depending on your goal, you choose between aggressive cutting compounds (polishing liquids), medium polishes, and finishing polishes. However, in contrast to sand paper, those polishing liquids aren’t “one hit wonders”, meaning they don’t only cut or only finish. Especially the introduction of aluminum oxide as the main polishing particles gave birth to products which e.g. start as rather aggressive compound, but then start to become finer and finer, as the aluminum oxide particles start as rough conglomerates, and then brake down to finer particles the longer you work the respective product.
In other words: you e.g. start with an 80 grit sand paper which then gradually breaks itself down to a 200 grit sand paper. However, there’s a limit to this process: you will never be able to start with a 40-grit sandpaper and end up with a 300-grit one. That’s currently and chemically not (yet) possible.
That’s why polishing liquids (and, to a lesser extent, polishing pads) will always be compromised products, and you’ll always have to test which ones achieve the required results with the least amount of clear coat removal and the necessary amount of work.
If you have understood this principle, polishing and paint correction is otherwise rather straightforward: you choose a polishing machine, a suitable polishing liquid and polishing pad, apply the liquid to the pad, and then start working with it.
Of course, there are a lot of variables that will all influence the results you get: the amount of time you spend on a paint section, the size of that section, the amount of pressure you apply, the speed of your chosen machine, the polishing action of that said machine (rotary, random orbital, forced rotational), the amount of liquid you apply, and so on. This is what makes polishing and paint correction complicated, and this is why our experience with it will help us achieve the best results on your car in a shorter amount of time than it would take yourself to do it.
When is paint correction required?
There’s no definite answer to the question of when a paint correction is necessary or advisable. The only true answer would be: You decide. Technically, and from a car manufacturer’s perspective, paint is there to protect a car’s body from the elements. That’s it! Of course, paint also makes cars visually appealing, but paint was originally invented and introduced to e.g. prevent rusting.
As we explained above, paint correction removes clear coat, so it therefore removes a little bit of the protection that a car’s paint is supposed to deliver. That’s why, in general, it is always advisable to apply at least some sort of paint protection after a paint correction job and maybe also change your car care routine to prevent or reduce future paint defects.
So, from a purely technical perspective, paint correction isn’t necessary at all. And if you purely look at your car as a personal transportation device, then it probably also won’t be necessary to think about paint correction.
But if you want your car to look nice, if you want it to be in its best possible state, then paint correction absolutely makes sense. Yes, paint correction will remove clear coat, but if performed properly, the amount of removed clear coat will be as minimal as possible, which is another reason to let a professional do it.
How often can you polish and correct a car?
Let’s repeat: polishing and paint correction remove clear coat. However, it’s actually a little bit more complicated than that. Deeper scratches and swirls will require more aggressive polishing techniques and materials (such as correcting compounds, wool or microfiber pads, and/or rotary polishers), which will in turn remove more clear coat. On the other hand, using a very fine and light finishing polish with a refining pad will remove close to no measurable clear coat.
As a general rule of thumb, we would suggest you should polish as often as necessary, but as rarely as possible. And because of that, it’s important that you make every paint correction count, which is another reason to seek the help of a professional like us.
Paint correction vs. waxing
At this point, you’re probably going to say that you don’t necessarily need to go down the route of paint correction and that a simple glaze or wax job can also make a car look better. And that’s perfectly true; however, waxing a car is not the same as paint correction, as one is a temporary fix, aka ''Camouflage'', and one is a permanent one. In this respect, waxing is “cheating” and only a shortcut to doing things properly.
Car detailing products like quick detailers, sealants, and glazes, as well as spray, butter or paste waxes, can indeed and technically create “gloss” by temporarily filling up light paint defects—but really only light ones! It’s the equivalent of fixing a scratch on a wooden floor with fake liquid wood.
This will always be a temporary solution, as those fillers generally only last a couple of days, maybe weeks. Real gloss and real perfection on car paints will always require paint correction, as it can only be achieved by removing paint defects instead of just filling them up.
In that respect, it’s also extremely important to understand that if you just fill up paint defects with something like a glaze or a wax, you afterwards cannot and shouldn’t apply a ceramic or otherwise protective coating. Well, technically, you can apply it, but it won’t be able to bond and adhere to the paint as there will be the respective wax or glaze in between the coating and the paint. Paint correction is the “correct” and proper preparation for a ceramic coating.
Long story short, paint correction makes your car look better by removing paint defects. Paint correction is the “proper” way of creating gloss and shine, whereas a simple “wash and wax” is a shortcut and temporary solution. And by the way, when we say paint correction will make your car’s paint look better, we absolutely mean that it can and will look better than when it came straight out of the factory or your dealership, as we are even able to reduce orange peel and truly bring out the shine that your car deserves.
Paint correction perfectly prepares your car for paint protection
It doesn’t matter if we talk about quick detailers, sealants, waxes or ceramic coatings: paint correction is and will always be the best way to prepare your car for an afterwards applied paint protection product. All paint protection products are developed to stick, adhere, or bond to bare paint. The more “stuff” there is on your car’s paint, the more paint defects there are in a painted surface, and the less optimal the bond of a protective product will be.
As soon as we talk about ceramic coatings, paint correction is absolutely vital in order to achieve the best possible results. In the best scenario, Sealants or waxes will merely “stick” to a car’s paint. Ceramic coatings, on the other hand, will physically and chemically bond to the paint surface, creating a semi-permanent, hard, additional layer on top of the clear coat, which acts as a sacrificial layer, protecting the paint underneath it.
In order for that to work, the paint surface will need to be as clean and flat as possible. Ceramic coatings, in that respect, have much worse filling capabilities than e.g. waxes. So, if you ceramic coat a car that has not been paint corrected, then the coating will in fact enclose these paint defects and even virtually enhance them.
Plus, applying a ceramic coating to non-corrected paint will decrease the potential durability of such products significantly. Waxes or sealants react to a much lesser extent to non-so-perfectly prepared paint. If the potential lifespan of a wax or sealant is a few weeks at best, then losing a week or two because you apply such a product to non-corrected paint won’t really matter. But if we look at ceramic coatings, which can potentially last several years, it will absolutely matter if you lose 50% of that performance because you didn’t go for a paint correction first.
Paint correction increases the value of your car
It’s a well-known fact that a clean, well-looked-after, properly serviced car will achieve higher prices than a completely beat-up one once you try to sell it. In that respect, a paint correction (and maybe also a ceramic coating application) will have the biggest impact on a used car’s price in regards to its visual appearance as you achieve the best possible paint condition for those tedious price negotiations.
As discussed above, paint correction is the proper way of achieving gloss. Real, proper gloss. If a potential buyer sees those deep reflections and that lustrous shine when you present him or her with your freshly polished car, psychological processes that lead to desire will start to evolve in his or her head.
But paint correction can also be beneficial with regard to leased cars. Leasing companies and dealerships usually inspect cars coming back after the agreed-upon leasing period particularly well. In some cases, they will try to get money from you based on paint defects. In such cases, even if you have to invest a little bit of money in it, paint correction can save you money if the amount spent for paint correction is less than what the dealership or leasing company would charge you.
Finally, if we talk about more exclusive cars, especially collectors’ cars, paint correction and afterwards paint protection are absolutely vital to hold and even increase the value of a car. The better the paint condition of such a car is, the stronger the desire to get it and, therefore, the higher the achievable price will be.
DIY vs. professional paint correction
By now, you probably understand why paint correction is good for your car. But you probably also think and tell yourself, “How hard can it be?” And yes, you could absolutely also go for paint correction and do it yourself. There’s a lot of great information and training material out there, e.g., on YouTube, which will help you get started with polishing and paint correction.
However, what most people don’t quite understand is that in order to be able to do paint correction, and if you want to do it to a similar standard that trained and experienced professionals are able to, you are looking at a serious investment. You see, the principles of paint correction are simple: you’re removing the clear coat and, therefore, levelling the paint to the level of the deepest scratches or swirls. But the simplicity ends right there because, as a cheap entry-level polisher, two polishing pads and a bottle of polish or compound will only get you so far. In fact, the question of which pads and which polish or compound you should opt for already opens a whole bottle of worms.
The simple fact of the matter is that no two polishing or paint correction jobs are the same: different paint types from different time periods in automotive production, different paint systems (single stage vs. multi-layer), different paint appearances (solid vs. metallic vs. pearl vs. candy vs. matte), or different paint hardness levels (soft vs. hard and everything in between). This is just the start because if you talk to guys working in the automotive industry, you’ll find out that it is absolutely possible that manufacturers stretch or thin out the paint they apply in the factory because they need to achieve certain daily production numbers. This means that even if we look at two otherwise identical cars from the same brand, same model, with the same paint code, they can behave differently in polishing.
So, in order to properly do a paint correction job yourself, and without going into too much detail, you will need the following equipment:
- At least 3 polishing machines, one for big surfaces (like e.g. our Dual Action polisher DDA15, DDA21 or a Dual Gear Rotary like the DDGR1), one for smaller ones (like e.g. a our DDA12), and one very small one for very intricate areas (like e.g. our Nano Hybrid Cordless).
- You’ll need a certain number of polishing pads. What most people don’t understand is that polishing pads are consumables and will wear out over time. What even fewer people understand is that you need more than one pad per car. As a reminder, paint correction means you remove the clear coat, so the removed clear coat needs to go somewhere—together with the used-up polishing liquid you’re using. And this place called “somewhere” is your polishing pads, which means they clog up over time. Yes, you can blow out polishing pads with compressed air, but this will only get you so far. And if you decide to wash them out, you’ll need to pause your polishing process. All of this is based on the principles of “residue control,” in case you want to do more research on it. What it means is that you need a lot of polishing pads. Since there are different aggression levels of polishing pads (to keep it simple, there are at the very least 2: one for cutting/compounding, one for finishing) as well as different pad sizes (for the above-mentioned three machines), you are realistically looking at 15-20 pads at the very least. This number will increase with the size of your car. And since we discussed above that no two polishing jobs are the same, it is very possible that you start with one set of pads from one manufacturer but will need to get a second set because the ones you first opted for simply don’t work on your car’s specific paint job. So, you’re once again down a few hundred dollars.
- You’ll need polishing liquids. In the best-case scenario, you will need to get one bottle of a correction compound and one bottle of finishing polish, which will perfectly work in conjunction with the pads you bought and your car’s paint. Realistically, you will need a few more bottles of different polishes from different manufacturers, as you’ll realize that your originally bought polishes simply don’t create the results you’re looking for. All of this means you’re investing another roughly 150 dollars in polishing liquids.
- Proper lighting is absolutely vital for paint correction. There are no two ways about it: without proper lighting, you simply can’t do paint correction as you won’t be able to check the results of your work. You won’t be able to see if scratches and swirls were removed, and you won’t be able to see things like “haze,” which can diminish the finish you are able to achieve. At the very least, you need a small but properly bright handheld polishing light e.g. Scan Grip. And no, the light from your mobile phone isn’t enough. The sun is a rather good light, but polishing and paint correction in direct sunlight and on hot panels definitely isn’t a good idea. So, you’re down another up to 200 dollars at the very least.
- A reliable paint depth gauge is also required. In order to know if you can even do paint correction on a car, you’ll need to know how much paint there is on the vehicle. Because once paint is removed by paint correction, you cannot get it back. And once you remove too much paint, you are looking at a new paint job, at least partially. So, in order to be safe, you will also need a reliable paint depth gauge, an electronic device that tells you how much paint there is on your car’s body. Reliable ones will cost you at least 100-200 dollars.
- You’ll need additional necessary equipment like high-quality microfiber towels (at least 10 pcs for one car, as they will get saturated like polishing pads do) and wipes or degreasers to reliably remove all polishing residue when you’re done. Going too cheap with these materials, especially microfiber towels, is plain stupid, as it defeats the whole purpose of paint correction. Overly cheap and low-quality microfiber towels can absolutely induce new swirls to your car’s paint. So, you’re looking at an additional 60+ dollars.
- Plus, there is additional equipment that isn’t strictly necessary but will make your life a whole lot easier. If you, e.g., want to prevent lower back pain or want to polish wheels by removing them, you’ll need some sort of car jack or scissor lifts—that's one hundred to several thousand dollars.
All in all, if you want to polish your own car on the same level as a professional can do, you will need to invest well over $1,000. And that’s before you factor in the time it takes you to do the job. A professional detailer has already invested in all of these materials (and continuously needs to reinvest) and can, therefore, allocate these costs to more cars. Plus, thanks to his or her experience, he will usually be able to do it a lot quicker than you can. In turn, professional detailers can offer a paint correction job for less than what it will cost you to do it yourself.
But if, as many do, you crave some challenges and enjoy working on some weekend projects, own more than one car, or if you can’t stand a bad-looking car, well, this might be worth the spending.
After all, let’s admit it, it can be absolutely satisfying when you get to finish, admire the end result, and say to yourself, Mission accomplished.


Leave a comment
This site is protected by hCaptcha and the hCaptcha Privacy Policy and Terms of Service apply.