Paint decontamination in car care
Car care can be intimidating, especially if you are new to it. There are hundreds, if not thousands of different products when you walk into a store. Reading the labels on those products sometimes helps, but more often than not, it confuses even further. Which product is for what? Why are there different car shampoos for different purposes when all you ever want to do is just wash your car?
But that`s just the start. You were probably curious enough to do a little bit of research first and found (more or less) helpful guides, articles, and videos on how to properly do car care or joined a Facebook group. The issue is that you are now probably even more confused by all the different product categories, naming conventions, or terminology that is thrown around in this field.
The good news is that we are here to help you! We won`t go into the whole introduction to car care or what it takes within a wholistic car care routine – as that`s enough content for three to four different blog posts – but we will tell you everything there is to know about one very specific step that is often overlooked, even more often misunderstood, but at the same time is what makes up for the difference between a mere “car wash” and a proper detailing job. We talk about paint decontamination.
Paint decon within the car care routine
Yes, the term paint decontamination sounds a bit technical and frightening but let us tell you that it is nothing you will ever need to be afraid of. For a start and to help you understand the meaning, importance, and magnitude of the decon step within a car care routine, let us walk you through and explain when and where paint decontamination is placed within such a routine.
In general, and to make it simple and easy for you, a wholistic car care routine regarding its different steppingstones on the outside of a car looks as follows:
- Wheel cleaning: always start with the dirtiest parts first with the help of wheel cleaners, brushes, and other tools at hand
- Prewash: remove as much dirt as possible before manually touching the paint with prewashes, pre-cleaners and/or snow foams
- (Hand) wash: now comes the bucket, shampoo, and wash mitt into play
- Paint decontamination: remove what`s left on or in the paint after washing the car
- Polishing: remove or reduce paint defects like swirls, scratches, haze or holograms by hand or with a machine polisher
- Paint protection: apply your chosen paint protection product to protect the paint from the elements
- Finishing touches: Make glass, plastics, tires and other areas look good and clean
So, in short, everything we do before the step of paint decontamination is to remove so-called „non-bonded contaminants” from your car`s paint. In other words, that`s stuff that just loosely sits on top of your car`s paint and can be removed by chemicals, a little bit of water pressure (from your pressure washer), and/or a little bit of “force” from e.g., a wash mitt.
To be fair, most cars will look rather good after the first three steps. And if you decide that you are done after those steps, that`s perfectly fine. Car care is not a strict scientific field in which you absolutely have to follow certain rules. Find what works for you and stick with that!
However, and if we talk about cars that receive this treatment for the first time ever, there will still be some “dirt” left on their paint jobs even after the most comprehensive prewash and wash routines. Why? Because there is stuff which can`t be removed by just washing your car. This stuff is also referred to as “bonded contaminants”. And these need some particular decontamination process to be removed. In other terms, Bonded contaminants stick to your car`s paint, more precisely the clear coat, or are actually embedded into the clear coat. Amongst other things, we most likely talk about tree sap, tar, glue, iron fallout, or mineral deposits when we talk about contaminations.
Do I need to go through paint decontamination?
Unfortunately, this question cannot be answered definitively. As we said above, you must decide whether to go through a paint decontamination step within your chosen car care routine.
As a general rule of thumb, we can give you the following tips and questions to ask as a checklist to help you decide when a paint decontamination process is probably a good idea:
- Are there contaminants (tree sap, tar, glue, iron fallout, or mineral deposits) on the car? If yes, then a decon step may be in order.
- Has the car you detail been adequately detailed and decontaminated before? If not, then paint decontamination probably is a good idea.
- Are you going to (machine) polish the car afterwards? If yes, then you definitely should think about a proper decon job.
- Do you wish to add any protection to your paint, whether it’s sealant, wax or ceramic coatings? You don’t want to seal contaminants on your paint
If the car you care for has been detailed and decontaminated before, then there`s absolutely no need to go through the whole decon process again. Generally, the golden rule of paint decontamination is: only if necessary!
That said, successful paint decontamination can make the difference between a clean and a shiny car–especially for light-coloured cars. No protective product which promises you “gloss” will ever be able to create as much of a visible impact on a white car as a proper paint decontamination process can. As a matter of fact, a car can be clean after you washed it but still look a tiny bit dull because of contaminations which are still on or in your car`s paint. If that`s the case, the decon stage might be the first action done before considering polishing!
Chemical vs mechanical decon
To remove contaminants like tree sap, tar, glue, iron fallout, or mineral deposits, there are different tools, techniques and chemicals – which can all lead to similar if not the same results. As a general rule of thumb which accounts for almost everything we do in car care, we suggest always choosing and using the gentlest, least intrusive means at hand first. Of course, this rule might be up for debate if you are a professional detailer and need to find methods which are not only gentle to your customers` cars, but are also time-efficient.
Commonly, you can choose between chemical and mechanical decontamination methods and steps. However, we generally suggest and propose to always first try and remove contaminants chemically. Why? Because chemical decontamination – if some fundamental principles of chemistry are followed, and common sense is at play – is usually gentler and less likely to induce (paint) damage than mechanical decontamination.
Products for chemical decontamination can roughly be divided in three categories:
- Tar and glue removers are designed to remove (or help you remove) stuff like glue, tree sap, or tar from your car`s paint. Some work better than others, some products in this category can be used to remove all of the contaminations mentioned above, and some are specialized towards one or two. If we talk about light contaminations, you may get away with spraying those chemicals onto the affected paint area and, after a short while, pressure washing them off again. That being said, especially with tree sap and tar, even more so if that stuff has been sitting on the paint for a while, you most likely need to support these chemicals with very gentle pulsating movements of a microfiber towel on the affected area. Never firmly rub with these chemicals and always use them on affected areas, never the whole car. Also, and generally, we recommend not using them on warm or hot panels or in direct sunlight.
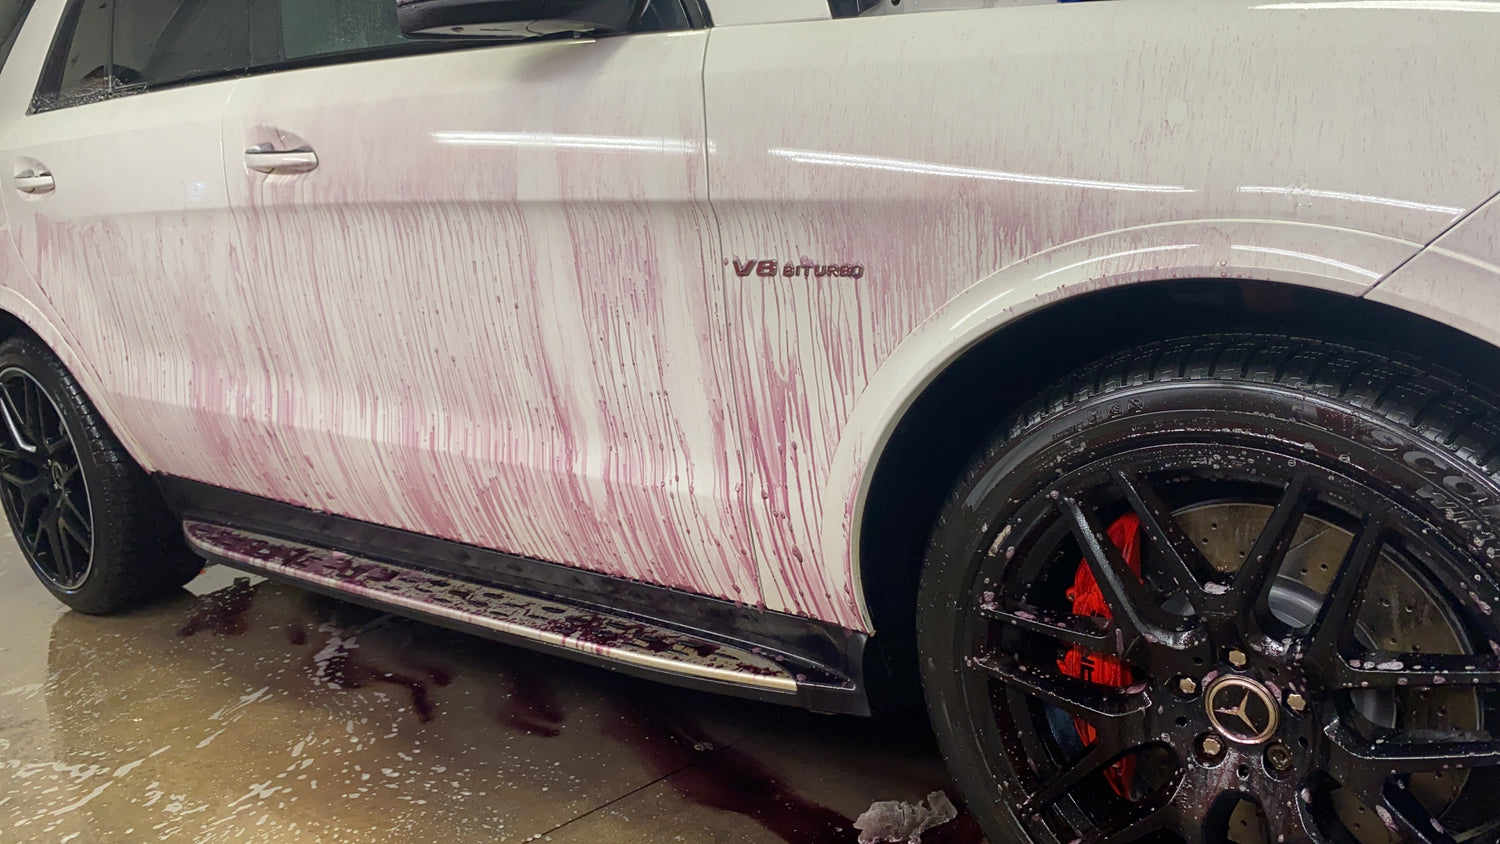
- Iron (fallout) removers are often similar to wheel cleaners. You spray those products on the affected areas of your car’s paint, let them sit there according to the manufacturer`s recommendations, and then pressure wash them off. Some of them are (very) acidic. They can only sit on the paint for one or two minutes; others have an ingredient that makes them stink like rotten eggs, but this ingredient is also responsible for a color-changing effect. As soon as that chemical hits an iron particle in your car`s paint, it reacts and turns purple.
- Mineral deposit and waterspot removers are usually (highly) acidic because you need strong acids to remove mineral deposits or water spots. You spray them onto the affected area, let them sit for a short time, and then remove them with a microfiber towel or pressure wash them off. Alternatively, there are also acidic shampoos and snow foams, but make sure that they are powerful and acidic enough to do the job.
With all of those products, it`s essential only to use them when needed and only on affected areas. Never spray the whole car with such products, especially not things like polished wheels without clearcoat, chrome/aluminium trim, unpainted plastics, and other delicate materials, as they could get stained.
We are often asked if we recommend using those products on wet or dry paint. Honestly, that doesn`t make as much of a difference as people think, but if you have the choice, then use them on dry paint, as any additional water would dilute those products and make them (slightly) less effective.
All of that being said, there’s a limit to chemical decontamination. This is why mechanical decontamination exists. To make it short, mechanical decontamination is a synonym for the term “claying” which is an abrasive way of removing decontamination that withstood the chemicals that you tried before. To do so, you use a clay bar with soft, medium or heavy grade, that you carefully move over your car`s paint in conjunction with an appropriate lubrication (to help the clay medium glide). You can use soapy water, a dedicated clay lube, a rinseless wash solution or even a quick detailer if decon is your final step and no other protection will be added, or no polishing has been planned.
Tips on how to clay your car
In today`s market, there are different clay mediums: clay bars, clay towels, clay sponges, clay mitts, clay pads… there are advantages and downsides to all of them, but to keep it short and simple for you: try them for yourself, and you`ll find what works best for you as the choice for a clay medium is as much about personal preference as it is about anything else. In general, and to help you with that decision, traditional clay bars (which look and feel like play dough) are usually considered to be a little bit more effective and safer. In contrast, clay towels, clay sponges, clay mitts, or clay pads work quicker, are less finicky and can be reused more often.
With most clay bars, you`ll have the choice between light, medium, and coarse/strong ones. Honestly, in our opinion, unless you are dealing with a really bad barn find, you are most likely never going to need a coarse or strong clay bar. A fine or medium one will do on 99% of cars and, more importantly, be much safer. Because no matter how careful you are when claying a car, you are almost always going to create and induce fine micro scratches or micro marring – especially visible on darker colors. That`s precisely why we told you above that mechanical decontamination using a clay bar is only recommended if needed and if you will polish that exact car afterwards.
That being said, the following tips should help you to reduce the risk of scratches when using a clay medium on your car:
- Use clay lubrication and use a lot of it
- Clay slowly so that you can feel and react once the clay starts being full of contaminants
- Clay in straight motions, not in circles
- If you use a clay towel (or something similar), wash it out regularly in a bucket of water and shampoo, ideally after every pass
- If you use a clay bar, inspect it regularly and as soon as you see in a clay bar, fold it so that you have a fresh and clean side to work with
- Never use pressure; let the clay medium of your choice glide over the paint with its own weight.
- Never re-use a clay bar once it has dropped to the ground.
- Use a fresh clay bar for every car to further reduce the risk of paint damage.
- Remove as much contamination as possible with the help of chemicals before you use a clay bar
As tempting and as gratifying claying can be ( because of how incredibly smooth the paint feels after doing it) we would still recommend asking yourself every single time before you start to clay a car: is it really necessary? As said above, it is virtually impossible to clay a car, even if you follow all of the above-mentioned tips, without inducing at the very least some very fine scratches or marring. And that`s why claying is usually and only recommended to do if a paint polishing stage follows it.
Do you need to clay before you polish?
Again, no one in the car detailing world can force you to do so. That being said, here`s a thought that might help you make that decision: paint polishing does remove clear coat. That`s how gloss is created by polishing; you remove paint defects. As you can imagine, if there is still contamination in the clear coat when you hit it with a polisher, those contaminations will be ripped out of the clear coat and scrubbed along the paint under the polishing pad. If that happens, you simultaneously remove and create paint defects. Doesn`t make too much sense.
Yes, on absolutely brand new cars, which you yourself drive off of the production line and into your garage where you want to polish, you might get away with skipping the clay bar stage. But that`s the only case we can think of in which we would think about not claying a car before polishing it.
Should I clay if I don`t polish but just apply wax to the car?
This honestly is the single hardest question to answer, and, once again, we cannot give you a definitive answer to it. In reality, it will depend. On comparably new and lightly contaminated cars, if you use a very fine (light) clay bar properly, you will probably only induce very few and very fine scratches during the claying stage in your decontamination process. And since (most) waxes have at least light-filling capabilities, these micro scratches won`t be visible next to all the other pre-existing paint defects anyhow.
Then again, if you are facing an older, heavily contaminated car, the optical improvement from removing as much contamination from the paint as possible before applying a wax could be worth it, even if you don`t polish that vehicle.
On the other hand, there are paint types out there which are incredibly soft and finicky which means they scratch very easily – and those become more and more widespread. Claying such paint, even if you only face light contaminations, you will probably end up with a result that`s worse than when you started.
On matte paint you should try and stick to chemical decontamination only. As explained above, claying is abrasive and could end up creating too much of a gloss enhancement on a matte clear coat.
As we stated, the question of whether you should or can clay a car when you afterwards “just” apply some protective product, be it a wax, quick detailer or paint sealant, really cannot be answered definitively and the answer will always be: it depends.


Leave a comment
This site is protected by hCaptcha and the hCaptcha Privacy Policy and Terms of Service apply.